Fork me on GitHub

scrapy爬虫入门

scrapy架构

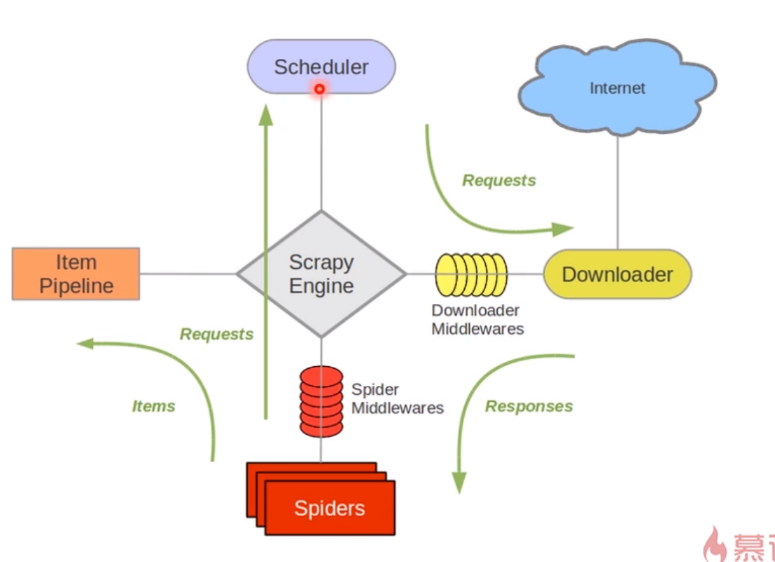
如图

scrapy

最中间的是scarpy的引擎,引擎指挥Spiders去爬取URL,spiders将requests发往调度器,调度器会针对这些请求进行排队,之后送往dowanloader,downloader会从internet上下载资源,将这些response发往spiders,spiders将其封装好送往item pipeline中

一个spider的工作流程大概就是如上所述

scrapy可以开启一个shell进行调试

1
2
3
4
5
6
(base) C:\Users\zz>scrapy shell https://www.anquanke.com
2019-08-19 19:18:54 [scrapy.utils.log] INFO: Scrapy 1.7.3 started (bot: scrapybot)
2019-08-19 19:18:54 [scrapy.utils.log] INFO: Versions: lxml 4.3.2.0, libxml2 2.9.9, cssselect 1.1.0, parsel 1.5.2, w3lib 1.21.0, Twisted 19.7.0, Python 3.7.3 (default, Mar 27 2019, 17:13:21) [MSC v.1915 64 bit (AMD64)], pyOpenSSL 19.0.0 (OpenSSL 1.1.1b 26 Feb 2019), cryptography 2.6.1, Platform Windows-10-10.0.18362-SP0
2019-08-19 19:18:54 [scrapy.crawler] INFO: Overridden settings: {'DUPEFILTER_CLASS': 'scra

....

此时会得到一些对象

1
2
3
4
5
6
7
8
9
10
11
12
13
[s] Available Scrapy objects:
[s] scrapy scrapy module (contains scrapy.Request, scrapy.Selector, etc)
[s] crawler <scrapy.crawler.Crawler object at 0x00000269894A07B8>
[s] item {}
[s] request <GET https://www.anquanke.com>
[s] response <200 https://www.anquanke.com>
[s] settings <scrapy.settings.Settings object at 0x00000269894A0AC8>
[s] spider <DefaultSpider 'default' at 0x269897d5160>
[s] Useful shortcuts:
[s] fetch(url[, redirect=True]) Fetch URL and update local objects (by default, redirects are followed)
[s] fetch(req) Fetch a scrapy.Request and update local objects
[s] shelp() Shell help (print this help)
[s] view(response) View response in a browser

此时可以针对我们的xpath进行调试

xpath如何获得?我们可以自己手动编写,或者直接通过chrome的开发者工具获得
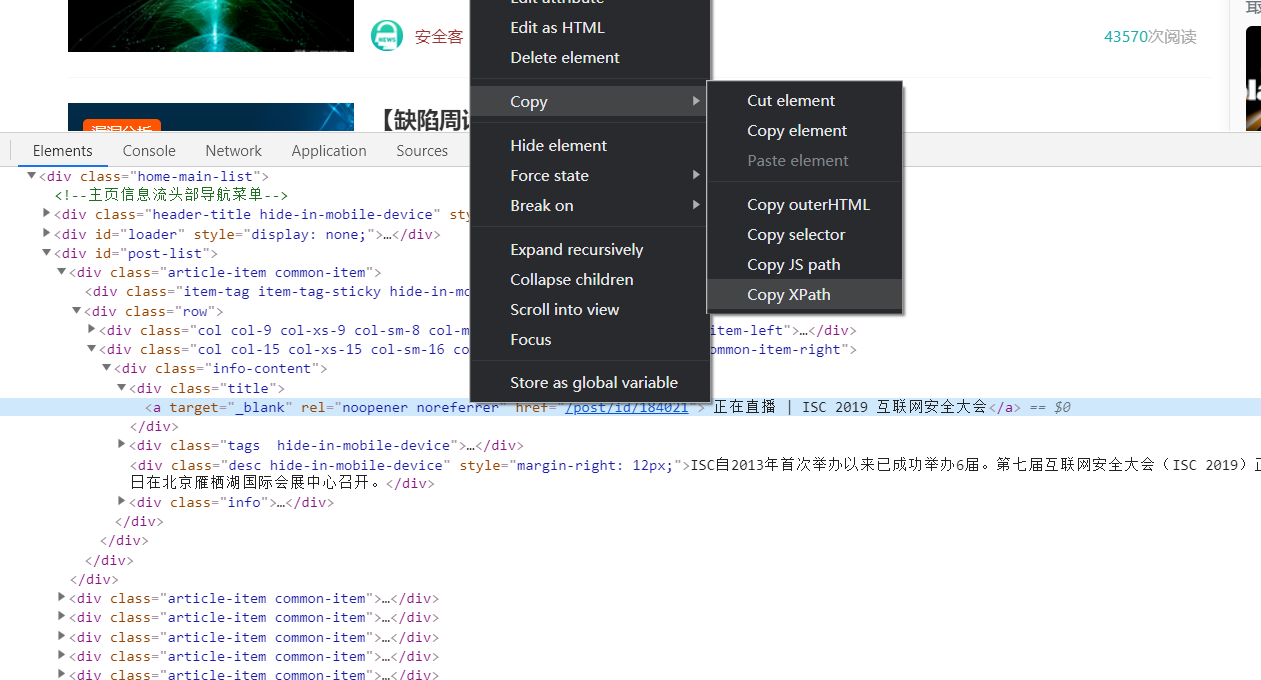
获取xpath

然后尝试一下对不对

1
2
3
4
5
In [2]: response.xpath('//*[@id="post-list"]/div[1]/div[2]/div[2]/div/div[1]/a')
Out[2]: [<Selector xpath='//*[@id="post-list"]/div[1]/div[2]/div[2]/div/div[1]/a' data='<a target="_blank" rel="noopener nore...'>]

In [3]: response.xpath('//*[@id="post-list"]/div[1]/div[2]/div[2]/div/div[1]/a/text()').extract()
Out[3]: [' 正在直播 | ISC 2019 互联网安全大会']

这样就能爬取下来了

一个简单的爬虫

我们看一下官方提供的一个栗子

目录结构如下:
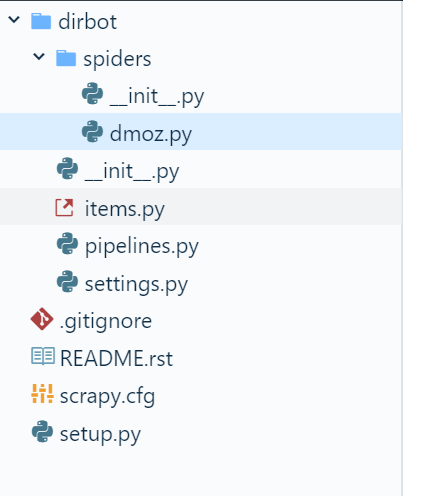
目录结构

在items.py文件中:

1
2
3
4
5
6
7
8
from scrapy.item import Item, Field


class Website(Item):

name = Field()
description = Field()
url = Field()

这里定义了我们需要爬取的items,稍后我们将在我们的spider中编写xpath规则来提取我们需要的数据

在dmoz.py中(爬虫的名字叫dmoz,名字必须唯一)

1
2
3
4
5
6
7
8
9
10
11
12
13
14
15
16
17
18
19
20
21
22
23
24
25
26
27
28
29
30
31
32
33
34
35
36
37
38
from scrapy.spiders import Spider
from scrapy.selector import Selector

from dirbot.items import Website # ---> 导入了我们之前定义的items


class DmozSpider(Spider):
name = "dmoz"
allowed_domains = ["dmoz.org"]
start_urls = [
"http://www.dmoz.org/Computers/Programming/Languages/Python/Books/",
"http://www.dmoz.org/Computers/Programming/Languages/Python/Resources/",
]

def parse(self, response): # spider默认的回调函数
"""
The lines below is a spider contract. For more info see:
http://doc.scrapy.org/en/latest/topics/contracts.html
@url http://www.dmoz.org/Computers/Programming/Languages/Python/Resources/
@scrapes name
"""
sites = response.css('#site-list-content > div.site-item > div.title-and-desc')
items = []

'''
解析数据
'''
for site in sites:
item = Website()
item['name'] = site.css(
'a > div.site-title::text').extract_first().strip()
item['url'] = site.xpath(
'a/@href').extract_first().strip()
item['description'] = site.css(
'div.site-descr::text').extract_first().strip()
items.append(item)

return items

可以看到这就是一个简单的,可以运行的爬虫了

当然还有后续的步骤,包括如何爬取更多的数据,如何换页,如何将数据存入数据库中等等

参考

xpath学习